
This site contains affiliate links, view the disclaimer page for more information.
There’s something about olive, garlic and rosemary focaccia that feels like home to me. It’s rustic, it’s fragrant, and it’s the kind of bread that doesn’t just feed people, it gathers them. I’ve been baking variations of focaccia for years, but this combination of briny kalamata olives, earthy rosemary, and sweet roasted garlic slices is my favorite, hands down.
It’s the bread I pull out during the holidays when family fills my kitchen and the house smells like cinnamon, pine, and something roasting in the oven. It’s the bread I bake on a chilly fall evening, when a pot of soup is simmering on the stove, and I know dinner will feel like a warm hug.
The truth? Focaccia looks fancy but is ridiculously simple to make. You don’t need a mixer. You don’t even need to knead. What you do need is time, time to let the dough rise and develop flavor, and time to let the oven transform flour, water, and yeast into something golden, bubbly, and irresistible.
Let me walk you through my process, along with stories, tips, and little ways I love to serve this olive, garlic and rosemary focaccia.

Table of Contents
Why I Keep Coming Back to Focaccia
I’ve baked a lot of bread in my life, but focaccia is the one I make over and over. Why?
- It’s foolproof. Seriously. No kneading, no complicated shaping. Just mix, rise, bake.
- It’s flexible. Top it with olives, garlic, caramelized onions, roasted tomatoes, you name it.
- It’s a showstopper. Golden crust, dimples glistening with olive oil, herbs tucked into the dough, it always looks impressive.
- It’s holiday-ready. I serve it as an appetizer with dips, as a side to roast chicken, or sliced for sandwiches the next day.
I’ll never forget the first time I brought a tray of focaccia to a holiday dinner. Everyone thought I had bought it from a bakery. The pan disappeared before I even sat down at the table. That’s when I realized: focaccia isn’t just bread, it’s a centerpiece.
Ingredients You’ll Need
This recipe is straightforward, but each ingredient plays a role. Here’s what goes into my version:
- 4 cups all-purpose flour – the base of our dough, giving it structure.
- 1 ¾ cups warm water (not too hot) – warm enough to activate yeast but not scald it.
- 1 packet active dry yeast (2 ¼ tsp) – the magic that makes the dough rise.
- 1 ½ tsp granulated sugar – a little food for the yeast to get things going.
- 2 tsp salt – balance and flavor.
- 5–6 tbsp olive oil (divided) – the star of the show, creating flavor and that crisp crust.
- 1–2 sprigs fresh rosemary – woodsy, aromatic, and perfect with bread.
- 1 garlic clove, thinly sliced – roasts into little golden slivers on top.
- 10–15 kalamata olives, halved or sliced – briny pops of flavor tucked into the dough.
- Optional: flaky sea salt for sprinkling – because focaccia loves a salty finish.
Supplies: parchment paper (optional), 9×13 ceramic baking dish

Step-by-Step: How I Make Olive, Garlic and Rosemary Focaccia
I’ve fine-tuned this process so it’s easy enough for weeknights and reliable enough for holidays.
1. Activate the Yeast
In a large bowl, I mix warm water and sugar, then sprinkle yeast on top. Within 5–10 minutes, it gets foamy and bubbly, proof that the yeast is alive and ready to work.
Tip: if nothing happens, or the yeast sinks to the bottom your water may have been too hot (killing the yeast) or too cold (not waking it up). Start again, yeast is forgiving as long as you catch it early.

2. Mix the Dough
Next, I stir in flour and salt. No kneading, no stress. Just a wooden spoon and a few minutes of stirring until it forms a shaggy, sticky ball.

3. First Rise
Here’s where patience comes in. I cover the bowl and let it sit for 4–5 hours at room temperature. The dough doubles in size, airy bubbles forming underneath. This is my favorite stage. I can walk away, clean the kitchen or just relax while the yeast does the work.
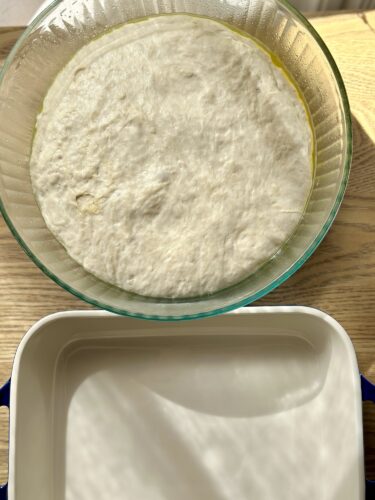
4. Prepare the Pan
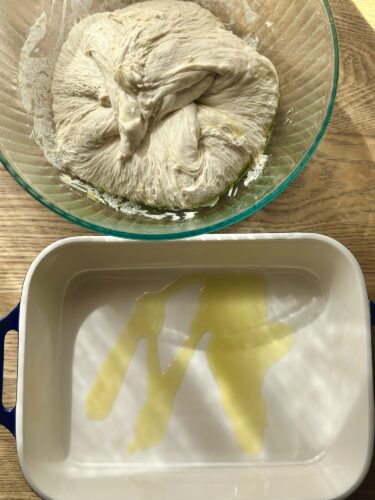
I oil my 9×13 ceramic baking dish with a generous drizzle of olive oil. Don’t skimp, this step creates that incredible crispy, golden bottom crust that focaccia is famous for. Alternatively you can also use parchment paper in a ceramic baking dish and then drizzle some olive oil in that.
With two forks, I scoop the dough from the edges into the center, rotating as I go. It forms a soft ball, still sticky but easier to handle.

5. Second Rise
With oiled hands, I transfer the dough into the prepared pan. I cover it and let it rise for another hour. This shorter rise gives the bread its final puff, ensuring it’s light and airy inside.


6. Dimple & Top
Here’s the fun part adding the toppings and the dimples. I drizzle olive oil on the rosemary, olives, and garlic slices so that they dont burn in the oven. Then I place them evenly on the bread before dimpling. This way the olives and rosemary get into the dimples and are less likely to fall off when cutting.


To do the dimples, I add another drizzle of olive oil across the surface, then press my fingers into the dough to create those signature focaccia dimples.

I scatter any leftover sliced garlic, rosemary sprigs, and kalamata olives across the top, pressing them gently so they bake into the dough instead of sitting on top. Then sprinkle on flaky sea-salt just before baking
7. Bake
Into a 400°F oven it goes for 30 minutes. The smell is heavenly, rosemary, garlic, and bread mingling in the warm air. By the time it comes out golden brown, my whole kitchen smells like a bakery.


8. Cool & Serve
I let it cool for 5–10 minutes before slicing. It’s hard to wait, but this short rest keeps the crumb intact and the flavor balanced.

Tips for the Best Olive, Garlic and Rosemary Focaccia
Over the years, I’ve picked up little tricks that make this bread consistently golden, airy, and flavorful. Focaccia is simple at its core, but these tips elevate it from good to bakery-level amazing:

- Reheat like a pro. If you’re enjoying leftovers, skip the microwave. Instead, warm slices in a hot oven for a few minutes. The crust crisps back up and tastes like it’s fresh from the oven.
- Use quality olive oil. The flavor of this bread depends heavily on olive oil, so choose one you love. A peppery, robust extra virgin olive oil adds depth, while a milder one lets the garlic and rosemary shine.
- Don’t skimp on the oil in the pan. I know it seems like a lot, but that pool of oil at the bottom of the pan is what creates the signature crisp crust. Think of it as shallow-frying the bread, it’s worth every drop.
- Be patient with the rise. A slow, long rise gives focaccia its chewy, airy texture and complex flavor. If you rush it, you’ll lose that beautiful structure of big, uneven holes inside the bread.
- Oil your hands before handling the dough. This dough is sticky, and it’s supposed to be. Coating your hands in olive oil makes it easy to transfer without frustration.
- Dimple with confidence. Don’t be shy when pressing your fingers into the dough. Those little craters are what catch the olive oil, garlic, and rosemary, infusing flavor into every bite.
- Press toppings gently into the dough. If you just sprinkle them on top, they’ll fall off during baking or slicing. Press olives, garlic slices, and rosemary slightly under the surface so they bake in.
- Bake in the right pan. I love using a ceramic 9×13 dish because it distributes heat evenly and gives the bottom crust a golden crispness. Cast iron also works beautifully for a slightly thicker, chewier focaccia. Parchment paper helps keep it from sticking to the bottom of the pan.
- Don’t cut it too soon. I know how tempting it is, but let it rest at least 5–10 minutes before slicing. This keeps the crumb intact and prevents steam from making it gummy.
Sprinkle flaky sea salt right before baking. It’s that final touch of crunch and saltiness that makes every bite pop.
Olive, Garlic and Rosemary Focaccia as a Seasonal Tradition
Over time, this bread has become more than just a recipe for me, it’s a tradition. When the weather turns cool and the days get shorter, I instinctively reach for my focaccia pan. There’s something about the act of making bread that feels grounding during busy seasons.

In the fall, I serve it with hearty soups like creamy mushroom or roasted tomato bisque. A slice of warm focaccia dipped into a steaming bowl feels like the coziest kind of comfort.
At the holidays, it takes center stage on the table. My family always expects it, almost like they expect the turkey or the mashed potatoes. I’ll bake two pans, one for dinner and one for snacking the next day. Leftover focaccia makes incredible turkey sandwiches with cranberry sauce, or even little breakfast toasts topped with eggs. This olive, garlic and rosemary focaccia has become that for us, a dish that signals celebration, warmth, and connection.
Serving Ideas for Olive, Garlic and Rosemary Focaccia
This focaccia is so versatile that I find myself serving it in different ways depending on the season, the meal, or even just my mood. Here are my favorite ways to enjoy it (and a few extra ideas for when you have leftovers):
- Soup Night Staple
- Nothing beats dipping warm squares of focaccia into a steaming bowl of soup.
- My go-to pairings: creamy tomato basil, sweet potato soup, mushroom soup, or hearty minestrone.
- The bread soaks up broth beautifully without falling apart, giving you that perfect bite of soup-soaked goodness.
- Holiday Appetizer Board
- Slice focaccia into small squares and serve it with:
- Olive oil + balsamic vinegar for dipping
- A soft cheese like brie or goat cheese
- Cured meats and marinated veggies
- It instantly turns into a rustic appetizer spread that feels festive without any extra effort.
- Slice focaccia into small squares and serve it with:
- The Ultimate Sandwich Bread
- Slice a square in half and fill it with roasted vegetables, mozzarella, and pesto.
- Or make an Italian-style sandwich with prosciutto, arugula, and provolone.
- Press it in a panini press or skillet for melty, golden perfection.
- Side Dish for Pasta Nights
- I love serving this alongside a classic spaghetti marinara, creamy fettuccine Alfredo, or baked lasagna.
- The garlicky, olive-studded bread balances rich sauces and adds texture to the meal.
- Breakfast or Brunch Twist
- Toast a slice and top it with a fried egg, smashed avocado, or even ricotta and honey.
- Focaccia isn’t just for dinner, it makes a hearty, savory start to the day.
- Next-Day Leftover Magic
- Cube leftover focaccia, toss it with olive oil, and toast in the oven for croutons.
- Use it in a holiday stuffing recipe for an extra garlicky, rosemary-scented twist.
- Turn it into focaccia pizza, just add toppings and bake until bubbly.

No matter how I serve it, this olive, garlic and rosemary focaccia always feels like the star of the table. It’s the kind of bread that can carry a simple meal or elevate a feast.
Variations I’ve Tried
Once you master the base recipe, it’s fun to play with toppings:
- Caramelized onions and thyme.
- Cherry tomatoes and basil.
- Sun-dried tomatoes and feta.
- Pumpkin focaccia
- Whole wheat flour for a heartier version.

Every variation feels new, but the process stays the same.
Make Ahead & Storage
This focaccia is best the day it’s baked, but it also stores well:
- Make ahead dough: Mix the dough the night before, refrigerate it, and let it rise slowly overnight. In the morning, bring it to room temp, transfer to the pan, and continue.
- Storage: Keep leftovers in an airtight container at room temp for 2–3 days.
- Freezing: Slice into portions, wrap in foil, and freeze. Reheat in the oven to bring back that crisp crust.
My Comfort Focaccia
Every time I bake this olive, garlic and rosemary focaccia, I’m reminded that the best food doesn’t need to be complicated. Flour, water, sugar, yeast, olive oil, and a few toppings, that’s it. Yet the result feels like something worthy of a bakery window or a holiday feast.
If you’re looking for a bread that’s easy, impressive, and versatile, this is it. Try it for your next fall dinner with soup. Bake it as a holiday side. Or just make it for yourself on a Sunday afternoon.
Either way, your kitchen will smell amazing, your family will be impressed, and you’ll have a golden, fragrant pan of bread that feels like it was made to be shared.

Recipe:
Kalamata Olive, Garlic and Rosemary Focaccia
Supplies Needed
- Large mixing bowl
- 9×13 ceramic dish
- Parchment paper (optional, for easier cleanup and no sticking to the pan)
Ingredients
- 4 cups all-purpose flour
- 1 ¾ cups warm water (110°F)
- 1 packet active dry yeast (2 ¼ tsp)
- 1 ½ tsp granulated sugar
- 2 tsp salt
- 2 tbsp olive oil (plus more for drizzling)
- 1–2 sprigs rosemary
- 1 garlic clove, thinly sliced
- 10–15 kalamata olives, halved or sliced
- Optional: flaky sea salt
Instructions
- In a large bowl, combine warm water and sugar. Sprinkle yeast on top and let sit 5–10 minutes until foamy.
- Add flour and salt. Stir until dough forms a rough ball.
- Cover and let rise 4–5 hours at room temperature, until doubled.
- Oil a 9×13 pan with olive oil. Use two forks to pull dough edges of the dough into the center, rotating to form a ball.
- Coat hands in olive oil and transfer dough to pan. Cover and let rise 1 hour, until doubled.
- Drizzle 1–2 tbsp olive oil over dough. Use fingers to press dimples across the surface. Add rosemary, garlic, and olives (coat in oil to prevent burning).
- Bake at 400°F for 25-30 minutes, until golden brown. Cool 5–10 minutes before slicing.
Tips for Success
- Don’t skip the dimpling. Those little finger dents help trap olive oil and keep the focaccia moist.
- Let it rise fully. A longer rise (up to 2 hours) gives you that airy, bakery-style texture.
- Use a cast-iron pan if possible. It creates a crisp, golden crust with a soft, fluffy center.
- Add toppings at the last rise. Pressing in garlic, olives, and rosemary right before baking keeps them from sinking.
- For extra flavor, drizzle with good-quality olive oil just before serving.
Enjoy!
With love,
Bri & Cat
Affiliate Disclaimer:
As an Amazon Associate I earn from qualifying purchases. This comes at no additional cost to you. We only recommend products that we believe will add value to our readers.
Leave a Reply