This site contains affiliate links, view the disclaimer page for more information.
I have a problem. Every flat surface in my house now has a little glass vase with reeds sticking out of it. My bathroom counter. My nightstand. The kitchen windowsill. The entryway table where the keys live. There’s even one in my laundry room, which, if you’ve ever walked into a laundry room that smells like eucalyptus instead of forgotten wet towels, you understand completely.
It started with a Saturday afternoon, a pile of thrifted bud vases I’d been collecting for no clear reason, and a YouTube rabbit hole about DIY home projects. Within an hour, my whole house smelled like I was the kind of person who burns fancy candles and uses linen spray and cares about the olfactory experience of walking through my own front door.
These DIY reed diffusers are genuinely one of the easiest things you can make. And once you realize that, you will not stop making them.
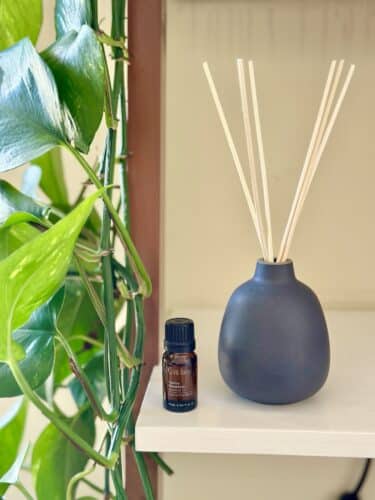
Table of Contents
What Is a Reed Diffuser?
If you’ve ever walked into a hotel lobby, a nice spa, or that one friend’s house that always smells incredible, there’s a good chance a reed diffuser was involved. They’re those simple little setups: a glass vessel filled with scented oil, with a bundle of thin sticks (called reeds) standing up in it. The reeds slowly absorb the oil and release the fragrance into the air, no flame, no heat, no electricity required.
That passivity is honestly what makes them so appealing. Candles are wonderful, but they require your attention. You have to light them, watch them, remember to blow them out before you leave the house (or lie awake at 2 am wondering if you blew them out). Reed diffusers just… exist. They quietly do their thing all day long while you live your life. You place one in a room and then you don’t think about it again for a week. That’s the dream.

Why Make Them Yourself?
Fair question. Reed diffusers are easy enough to find in stores, and they’re everywhere from Target to TJ Maxx to boutique gift shops. So why bother making your own? A few reasons, and they add up fast.
The cost is genuinely shocking. Store-bought reed diffusers often run anywhere from $15 to $60 depending on the brand. A DIY batch costs a fraction of that, we’re talking a few dollars per diffuser once you have your supplies. The essential oils are a bit of an investment upfront, but they last a long time and you’ll use them across dozens of batches.
You control the scent completely. No settling for whatever fragrance combinations some product developer decided to make. You can blend your own, go heavy or light on certain notes, and adjust the strength to your preference. It’s genuinely a little like being a perfumer, just with less pressure and more coconut oil.
They make incredible gifts. A small glass vase, a pretty ribbon, and a handmade reed diffuser is one of those gifts that looks like it cost more than it did and feels more thoughtful than anything you could buy. Hostess gift, teacher gift, neighbor gift, “thank you for watching my cat” gift, it works for all of them.
The thrift store angle. If you’re a thrift store person at all, you’ve definitely seen those little glass bud vases. They’re everywhere. Usually a dollar or two. For a long time I’d buy them because they were pretty and then have no idea what to do with them. Reed diffusers solved that problem entirely.

What You’ll Need
The supply list for DIY reed diffusers is refreshingly short.
Equipment
- Small glass vessel: A bud vase is ideal. You want something with a narrow neck to slow the evaporation rate and hold the reeds in place. Thrifted finds work beautifully; look for bottles with necks narrow enough that the reeds stand up rather than flop over. Mason jars technically work but the wide mouth means the scent evaporates faster.
- Rattan reed sticks: These are the actual diffuser reeds, and they matter more than you’d think. More on this in a minute.
- A small funnel: Optional but worth having. Pouring oil into a narrow-necked vase without one is an exercise in patience that I personally don’t recommend.
Ingredients (per diffuser)
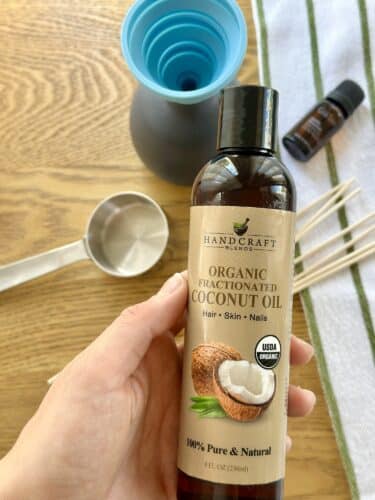
- ⅓ cup fractionated coconut oil: This is your carrier oil, the base that holds and distributes the scent. The “fractionated” part just means it stays liquid at room temperature rather than solidifying the way regular coconut oil does. It’s clear, lightweight, and travels up the reed sticks better than most alternatives.
- 1 tablespoon vodka: Yes, regular drinking vodka. The alcohol helps the essential oils disperse evenly through the carrier oil (they don’t naturally blend well), and it slightly thins the mixture so it wicks up the reeds more effectively. You don’t need anything fancy, the cheapest bottle on the shelf works fine. You can also use regular rubbing alcohol as well
- 25–30 drops essential oils: This is where the fun happens. Single oils work great; custom blends work even better.

A quick note on the carrier oil: I’ve experimented with jojoba oil as a substitute and it’s fine in a pinch, but honestly the results aren’t as good. The scent just doesn’t travel up the reeds as effectively and you end up with something that smells faint and underwhelming. Fractionated coconut oil is cheap, widely available (Amazon, most health food stores, many pharmacies), and consistently outperforms the alternatives. Stick with it. This is the one I use: HERE
How to Make It: Step by Step
The actual process takes maybe ten minutes, and most of that is choosing your scent.

Step 1: Prep your vessel. Give it a wash and dry if it’s thrifted or has been sitting in a cabinet. Make sure it’s completely dry before adding oil, water and oil don’t mix, and residual moisture can mess with your diffuser down the line.
Step 2: Add the fractionated coconut oil. Use your funnel if you have one. Pour ⅓ cup into the vessel. Don’t fill it to the very top, you want some room for the reeds and for the oil level to drop as it evaporates without making a mess.
Step 3: Add the vodka. Pour in 1 tablespoon.
Step 4: Add your essential oils. Drop in 25–30 drops of your chosen oil or blend. If you’re combining multiple oils, this is the moment to layer them in. Give the mixture a gentle swirl (don’t shake, you don’t want bubbles).
Step 5: Insert the reeds. Drop 4–6 reed sticks into the vessel. They’ll start absorbing the oil immediately.
Step 6: Flip the reeds after an hour. After about an hour, pull the reeds out and flip them so the saturated end is pointing up. This jumpstarts the diffusion and gets the scent moving into the room faster.
Step 7: Maintain weekly. Once a week, flip the reeds again to refresh the fragrance. Every 1–2 months, replace the oil mixture entirely, the reeds will eventually become too saturated to wick effectively, and the fragrance will fade. That’s genuinely it. Ten steps that take ten minutes.


A Word About Reed Sticks
This sounds like a weird thing to have opinions about, but here we are. Not all reed sticks are created equal, and using the wrong ones is one of the most common reasons homemade diffusers don’t work well.
Rattan reeds are what you want. They have natural channels running through them (tiny capillaries) that draw the oil upward through the stick and release it into the air at the top. They do exactly what a diffuser reed is supposed to do.
Bamboo skewers (the ones you use for kebabs) look similar but don’t have those channels. The oil sits on the surface rather than wicking through. They don’t work.
Decorative sticks any kind of dyed, treated, or lacquered wood, also won’t diffuse properly. The coating blocks absorption.
Rattan reeds are inexpensive and easy to find online (a pack of 100 costs just a few dollars), so there’s no reason to improvise here. Get the real thing.

Scent Combinations by Room
This is honestly the most fun part of the whole project. Once you start thinking about scent the way you think about color or texture in a room, you can’t stop.
Here’s my room by room scent tips:
Living Room: Warm and Welcoming
The living room is where you want people to feel relaxed and comfortable from the moment they walk in. I gravitate toward warm, slightly sweet, slightly woody scents here, things that feel like a hug. My current favorite is a simple vanilla and sandalwood blend. It’s cozy without being cloying, and it works year-round.
Other combinations I love:
- Vanilla + sweet orange (warm but with a little brightness)
- Amber + cedarwood (deeper, more sophisticated)
- Vanilla + vetiver (grounding and slightly smoky)
Bathroom: Clean and Spa-Like
Bathrooms are small and you want them to feel fresh rather than perfumed. Sharp, clean scents are ideal, anything that reads as “this space is well-maintained” rather than “something is being covered up.” Eucalyptus has been a constant in my bathroom for over a year. On its own it’s clean and slightly medicinal in the best way. Paired with peppermint it gets even crisper.
Other options worth trying:
- Tea tree + lemon (very clean, very spa)
- Eucalyptus + lavender (calming but still fresh)
- Spearmint + lemon (bright and uplifting)
Kitchen: Citrus and Herbs
Kitchens accumulate smells. Cooking smells, garbage smells, that mysterious smell that appears every time you open the fridge. Citrus cuts through all of it beautifully. I keep a lemon + orange blend in my kitchen, and it genuinely makes the room feel cleaner just by walking in. Sometimes I add grapefruit for a little extra brightness.
Herb-forward combinations also work really well:
- Lemon + rosemary (crisp and aromatic)
- Orange + basil (fresh and slightly unexpected)
- Grapefruit + mint (energizing and clean)
Bedroom: Calm and Sleep-Friendly
The bedroom is where you want things quiet and settled. Lavender is the obvious choice and it’s obvious for a reason, it genuinely works. But if you find straight lavender too floral, blending it with something earthier helps.
Combinations I’d recommend:
- Lavender + bergamot (floral but not sweet)
- Chamomile + vanilla (deeply calming)
- Cedarwood + lavender (grounding and soft)
Home Office: Focused and Clear
This is a newer category for me since I started working from home, but scent in a workspace makes a real difference. Peppermint and rosemary are both associated with alertness and mental clarity, and I’ve found that a diffuser in my office genuinely helps me feel less foggy in the afternoon. Some good options:
- Peppermint + lemon (very alert and energizing)
- Rosemary + eucalyptus (focused and clear)
- Orange + peppermint (uplifting without being aggressive)
Seasonal and Holiday Diffusers
One of the things I love most about making my own diffusers is the ability to shift the scent of my home with the seasons. It’s a small thing but it makes a real difference in how a space feels throughout the year.
Fall is when I go full cozy. My home smells like the platonic ideal of October from about September 15th onward. No apologies. Best combos:
Winter holidays call for something a little more festive:
- pine, cedarwood and orange is a classic that never fails.
- Orange, clove and cinnamon is basically mulled cider in diffuser form.
- Vanilla and nutmeg works beautifully if you want something warm and sweet without going full Christmas.
Spring is my excuse to lean into florals and light greens. Everything feels like a window thrown open.
Summer for me is light and fresh and easy
These seasonal diffusers are also my go-to gift during the holidays. I package them with a small ribbon around the vase, a tag with the scent name, and a few extra reeds tied alongside, and they look genuinely beautiful. Nobody needs to know they took me fifteen minutes to make.
Tips That Actually Make a Difference
After making more of these than I can count, a few things have become clear:
Start with fewer reeds. Four or five is a good starting point. More reeds = stronger scent, but it also means the oil evaporates faster and you’ll be replacing the mixture more often. Start subtle and add more if the room needs it.
Keep them out of direct sunlight. Heat and UV light speed up evaporation significantly. A diffuser in a sunny window will last a fraction of the time of one in a shaded spot.
Don’t overfill the vessel. Fill it about halfway. As the oil level drops, you won’t lose much, the reeds will keep wicking from a lower level, and you won’t have any overflow mess that comes with filling it to the brim.
Flip your reeds consistently. The weekly flip makes a noticeable difference in fragrance strength. I keep it as part of my Sunday reset routine, it takes thirty seconds and the scent boost is immediate.

The Part Where I Admit This Has Become a Hobby
I want to be honest with you: I started making these to use up some bud vases. That was the whole plan. Now I have a small shelf of essential oils organized by scent family. I have a notebook where I write down blend ratios that worked particularly well. I’ve started buying interesting vessels on purpose, vintage apothecary bottles, little ceramic crocks, a tiny amber glass jar I found at an estate sale.
This happens to almost everyone who makes reed diffusers. They’re just satisfying enough and just easy enough that the experimentation never really stops. You make one that works, and then you think: what if I added bergamot to this? What if I made one specifically for the guest bathroom? What would a Christmas version smell like?
And then suddenly every flat surface in your home has a little vase with reeds in it, and you can’t walk through a room without it smelling exactly the way you want it to. Honestly? There are worse fates.

Now Go Find Some Bud Vases
If you’ve been looking for a simple home project that actually improves your daily life, this is it. DIY reed diffusers take about ten minutes to make, cost a few dollars per diffuser, and quietly do their job every single day without any attention from you. They work in every room. They make beautiful gifts. They let you customize the scent of your home in a way that no store-bought product really allows.
Start with one. Pick a scent you genuinely love, not what you think you’re supposed to like, not what seemed like it would be nice. Something that makes you feel good when you smell it. Put it somewhere you’ll notice it. Your nightstand, your kitchen counter, the little shelf in your entryway. And then just wait.
Chances are, within a week you’ll be googling “interesting glass vessels for reed diffusers” and wondering if your laundry room needs one. It does. The laundry room always needs one.
With love,
Bri & Cat
Affiliate Disclaimer:
As an Amazon Associate I earn from qualifying purchases. This comes at no additional cost to you. We only recommend products that we believe will add value to our readers.
DIY Reed Diffusers
Ingredients
- 1/3 cup fractionated coconut oil This is your carrier oil, the base that holds and distributes the scent. The "fractionated" part just means it stays liquid at room temperature rather than solidifying the way regular coconut oil does. It's clear, lightweight, and travels up the reed sticks better than most alternatives.
- 1 tbsp vodka Yes, regular drinking vodka. The alcohol helps the essential oils disperse evenly through the carrier oil (they don't naturally blend well), and it slightly thins the mixture so it wicks up the reeds more effectively
- 25-30 drops essential oil This is where the fun happens. Single oils work great; custom blends work even better.
Equipment
- 4-6 rattan reed diffuser sticks
- 1 small funnel Optional but worth having. Pouring oil into a narrow-necked vase without one is an exercise in patience that I personally don't recommend.
Method
- Step 1: Prep your vessel. Give it a wash and dry if it's thrifted or has been sitting in a cabinet. Make sure it's completely dry before adding oil, water and oil don't mix, and residual moisture can mess with your diffuser down the line.
- Step 2: Add the fractionated coconut oil. Use your funnel if you have one. Pour ⅓ cup into the vessel. Don't fill it to the very top, you want some room for the reeds and for the oil level to drop as it evaporates without making a mess.
- Step 3: Add the vodka. Pour in 1 tablespoon.
- Step 4: Add your essential oils. Drop in 25–30 drops of your chosen oil or blend. If you're combining multiple oils, this is the moment to layer them in. Give the mixture a gentle swirl (don't shake, you don't want bubbles).
- Step 5: Insert the reeds. Drop 4–6 reed sticks into the vessel. They'll start absorbing the oil immediately.
- Step 6: Flip the reeds after an hour. After about an hour, pull the reeds out and flip them so the saturated end is pointing up. This jumpstarts the diffusion and gets the scent moving into the room faster.
- Step 7: Maintain weekly. Once a week, flip the reeds again to refresh the fragrance. Every 1–2 months, replace the oil mixture entirely, the reeds will eventually become too saturated to wick effectively, and the fragrance will fade. That's genuinely it.
Leave a Reply