This site contains affiliate links, view the disclaimer page for more information.
Same day artisan bread is one of those things I genuinely thought was impossible or at least, something reserved for people with professional culinary training, a sourdough starter that’s been alive longer than some houseplants, and way too much time on their hands. I was wrong. Dead wrong. And now I make a gorgeous, crackling, golden-crusted loaf of same day artisan bread on a regular Tuesday without breaking a sweat.
If you’ve ever pulled a loaf out of a dutch oven and just stared at it like, who made this? Did I do that? you’ll understand why I keep coming back to this recipe. It’s the kind of bread that makes your whole kitchen smell like a Parisian bakery. It looks impressive. It tastes incredible. And the best part? You only need six ingredients and about six hours from start to finish, most of which is completely hands-off. Let me walk you through everything.
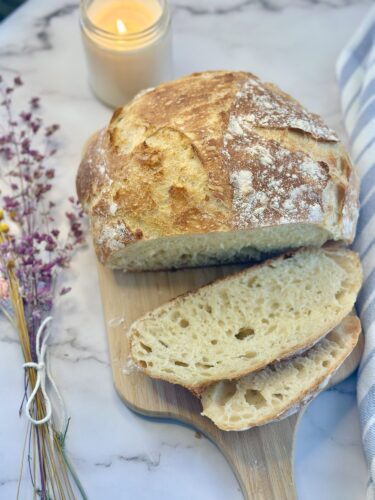
Table of Contents
The Myth That Artisan Bread Takes Days
Here’s what I believed for a long time: real artisan bread requires a starter you’ve been feeding for weeks, an overnight cold ferment, and some kind of ancestral bread-baking wisdom passed down through generations. I read blog posts that made it sound like a spiritual practice. And so I kept buying the $8 sourdough loaf at the farmers market and telling myself, “Someday.”
Someday came when I was stuck at home on a Saturday with nothing but pantry staples and a stubborn craving for fresh bread. I figured I’d try a simple same day artisan bread recipe I’d been bookmarking. I had flour, yeast, water, salt, sugar, and olive oil. I had a dutch oven I’d only ever used for chili. I had time.
That loaf wasn’t perfect. The score was a little shallow, the crumb was slightly denser than I wanted. But it had a real crust that shattery, crackly exterior that you only get when steam is trapped during baking. It tasted like something. It tasted like bread. I was hooked.
The secret, it turns out, is not time in the way I thought. It’s not about days; it’s about intervals. Short rests, repeated folding, and a bit of strategic cold rest in the fridge. That’s it. Your yeast does the heavy lifting.
Why This Recipe Actually Works
Before we get into the steps, I want to explain the why behind this method, because when I understood what was happening at each stage, I became a dramatically better bread baker. You don’t have to care about the science but I promise it makes the process feel less like following mysterious instructions and more like actually cooking.
High hydration dough. This recipe uses 1¾ cups of water to 3 cups of flour. That’s a wet dough. High hydration is what creates those big, open, chewy air pockets inside the bread the ones that catch pools of melted butter and make you close your eyes when you take a bite. The tradeoff is that a wet dough is stickier and harder to shape, which is why we use forks and wet hands instead of trying to knead it on a floured surface.

The fork pull and stretch-and-fold method. Instead of kneading which is really just a way of developing gluten structure we’re using time and folding. Every time you pull the dough in toward the center, you’re stretching and aligning those gluten strands. The repeated rests in between let the gluten relax and continue developing on its own. By the time you’re done, you have a surprisingly strong, elastic dough without ever turning it out and wrestling with it on a countertop.
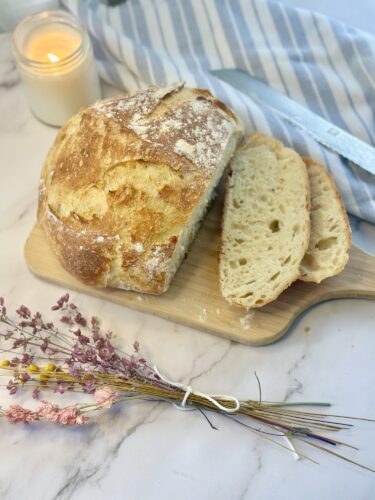
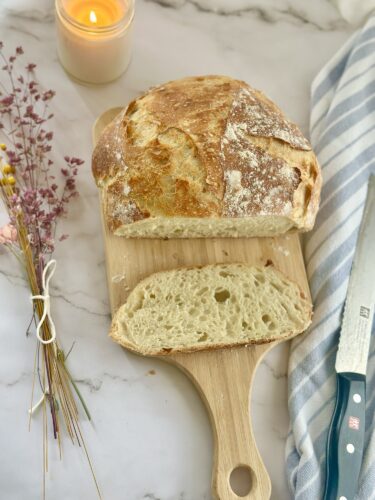
The dutch oven. This is the piece of equipment that changed my home bread baking completely. When you bake bread in a covered dutch oven, the moisture from the dough itself creates steam inside that enclosed space. That steam is what professional bakers inject into their ovens. It keeps the surface of the dough soft and flexible during the first phase of baking, so the bread can expand fully before the crust sets. Then you remove the lid and let the crust brown and harden. The result is a loaf that looks and sounds (yes, sounds; that hollow knock when you tap the bottom) like it came from a real bakery.
The refrigerator rest. I used to skip this step when I was impatient, and my loaves were always a little flat and spread-out. The fridge is not optional for a high hydration dough. Cooling the dough down briefly firms it up just enough to hold a round shape, so when you lower it into the hot dutch oven it bakes up tall and proud instead of pancake-flat. Thirty minutes is all it takes.
What You Need
Ingredients
- 3 cups all-purpose flour
- 1 packet active dry yeast (2¼ tsp)
- 1¾ cups warm water
- 1 tsp sugar
- 1 tsp salt
- 1 tsp olive oil
That’s six ingredients. Everything in here is pulling its weight. The sugar isn’t for sweetness; it’s food for the yeast, giving it a jump-start during the bloom. The salt controls fermentation and adds flavor. The olive oil adds just a little tenderness to the crumb and helps prevent the dough from drying out during its long rest. And the warm water (not hot, not cold) is what wakes the yeast up.
A note on water temperature: you want it to feel comfortable on your wrist, like bathwater. I usually aim for somewhere around 100 to 110°F. Too cold and the yeast won’t activate. Too hot and you’ll kill it. If your yeast doesn’t foam up in that first ten minutes, start over with fresh yeast. There’s nothing more disappointing than waiting three hours for dough that never rises because the yeast was dead.
Equipment
- Large mixing bowl
- Two forks (your most important tool in this recipe)
- Dutch oven with a lid
- Parchment paper
- Sharp knife or bread lame for scoring
- Cooling rack
You don’t need a stand mixer. You don’t need a bench scraper. You don’t need a proofing basket. Just these basics.
The Full Step-by-Step Process
Step 1: Bloom the Yeast 10 Minutes
This is where everything starts, and it’s the one step I never rush. In a large mixing bowl, combine your 1¾ cups of warm water, 1 teaspoon of sugar, and the yeast packet. Give it a gentle stir and then walk away. Set a timer for ten minutes.
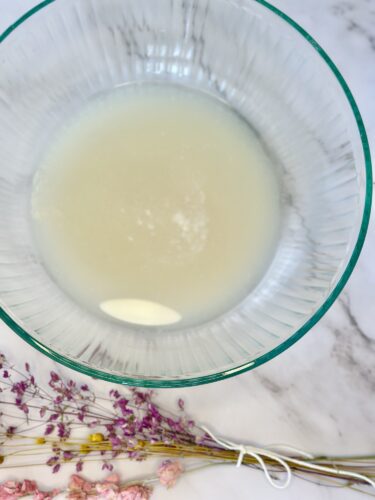
When you come back, the surface should be foamy and fragrant a little yeasty, a little funky, in the best possible way. That foam is proof of life. It means your yeast is active and hungry and ready to make your bread rise. If you don’t see foam after ten minutes, your water may have been too hot, your yeast may be old, or your kitchen might just be very cold. In any case: try again with fresh yeast before continuing.
This step takes less than a minute of active work and gives you total confidence before you invest the next several hours.
Step 2: Mix the Dough 5 Minutes
Add your 3 cups of flour, 1 teaspoon of salt, and 1 teaspoon of olive oil directly into the bowl with the yeast mixture.
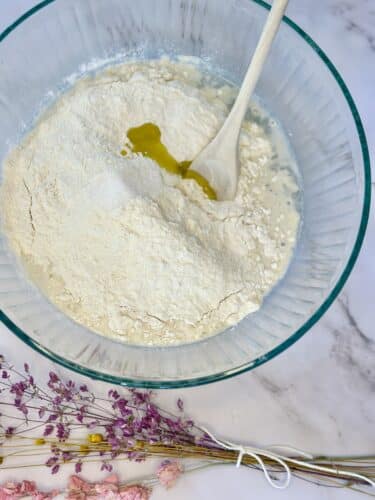
Stir everything together with a fork or a wooden spoon until a shaggy, rough dough forms and there are no dry flour pockets left. It’s going to look messy. It’s supposed to look messy. You are not trying to make it smooth. You are not going to knead it. You are just combining everything into a cohesive mass and covering the bowl with a clean kitchen towel or plastic wrap. That’s it. Walk away.
Step 3: First Rest and Fork Fold 1 Hour
Let the dough sit at room temperature, covered, for one full hour. When the hour is up, you’re going to do your first fork pull-in. Take two forks and insert them into the edge of the dough on opposite sides of the bowl. Pull the dough toward the center, stretching it gently before folding it in. Rotate the bowl and repeat. You’re essentially folding the dough over itself from all four sides north, south, east, west.

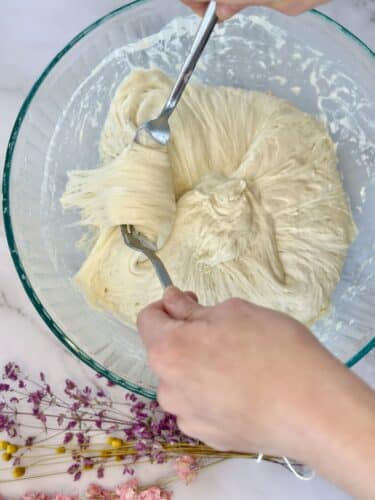
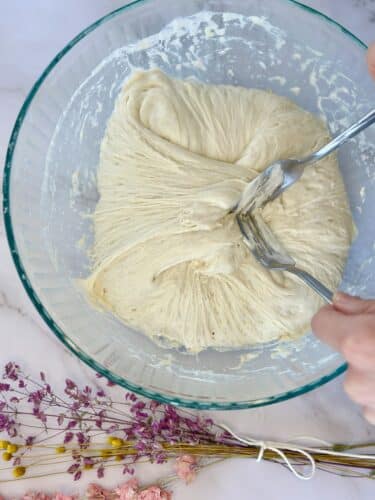
You don’t need to be precise about this. You’re not performing surgery. The goal is just to gently stretch the gluten that has been developing during that rest. After one round of pulls, cover the bowl again.
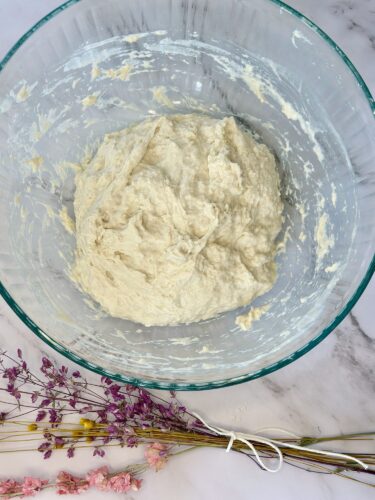
After this first fold, the dough will still look pretty rough. That’s completely normal and you should not be concerned.
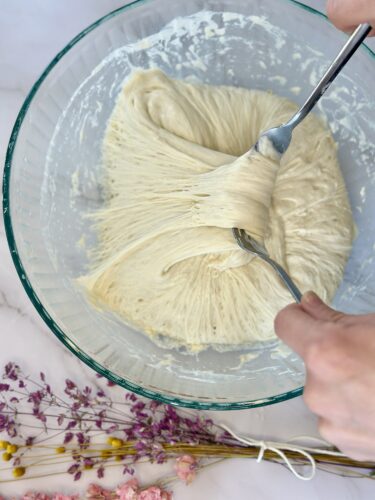
Step 4: Second Rest and Fork Fold 1 Hour
Cover the bowl again and let it rest for another full hour at room temperature.
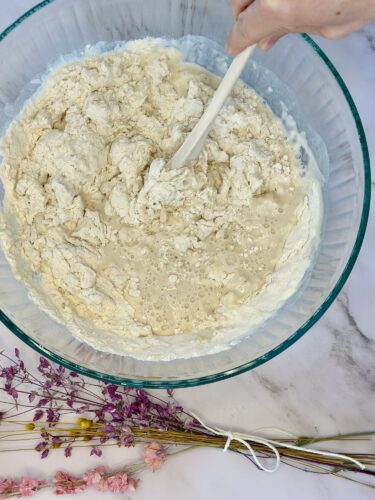
Repeat the same fork pull-in method. This time, you should notice a real difference. The dough will be smoother, a little more elastic, and it will pull away from the sides of the bowl more cleanly. That’s the gluten network strengthening. You’re building structure without ever kneading.
Do one full round of folds all the way around then cover again.
Step 5: Third Rise, Stretch and Folds, and Fridge Rest About 1.5 Hours
Let the dough rise one more time, covered, for a full hour. At the end of this third hour, the dough should look noticeably puffier. Now it’s time for the stretch-and-fold technique, which is slightly more involved than the fork pull but still completely approachable.
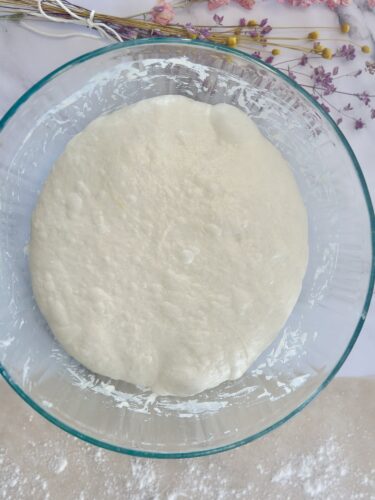
You can use two forks for this, or you can wet your hands wet hands are my preference because they stick less and give you better feedback on the dough’s texture. Reach into the center of the dough, grab it from underneath, and pull it up. Stretch it as high as it will go without tearing, then fold it over itself. Rotate the bowl slightly and repeat. You’re going around the dough doing this up, stretch, fold, rotate about five to six times total.
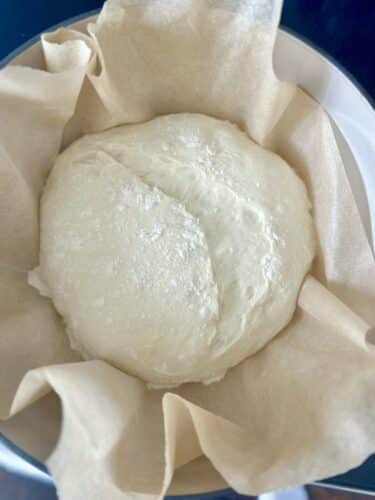
After your stretch and folds, you should be able to coax the dough into something roughly resembling a ball. Don’t stress about perfection here. Cover the bowl loosely and place it in the refrigerator for 30 minutes.
The cold does something really important: it tightens the dough just enough that it holds its shape when you transfer it to the parchment. High hydration doughs are notoriously floppy at room temperature, and the brief chill is the trick that keeps it together.
After 30 minutes, take it out and do one final round of stretch and folds. Shape it gently into a ball.
Step 6: Preheat the Oven and Prep the Dough 30 Minutes
Here’s something important: put your dutch oven in the oven before you preheat it. Set your oven to 450°F with the dutch oven inside. You want that vessel to be screaming hot when the dough goes in that sudden blast of heat is what gives you oven spring, the dramatic puff of growth that happens in the first few minutes of baking.
While the oven preheats, turn your dough ball out onto a piece of parchment paper that’s been lightly dusted with flour. Let it rest there for ten minutes.
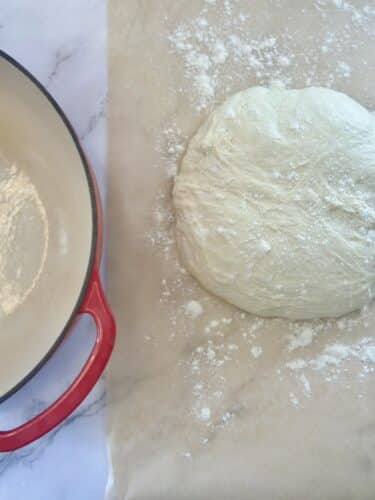

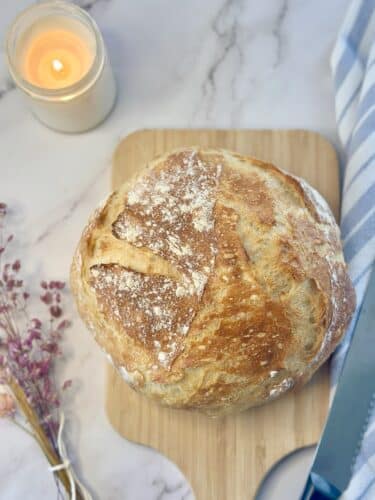
Then score it. Run a sharp knife or bread lame in a confident, single slash down the length of the top of the dough. Don’t hesitate a timid score drags and deflates. One firm stroke about a half-inch deep. Sometimes i’ll use kitchen scisors to score the bread if its too sticky. The score isn’t just decorative, it’s a controlled weak point that allows the bread to expand in a predictable direction as it bakes. Without it, the bread will burst open wherever it wants, which can look a bit chaotic.
Step 7: Bake About 50 Minutes Total
When your oven is fully preheated to 450°F, carefully remove the dutch oven use heavy oven mitts, this thing is extremely hot and lift the lid. Lower the parchment paper with the dough into the dutch oven. The parchment makes this so much easier and prevents any sticking. Put the lid back on and return it to the oven.
Bake covered for 30 minutes. During this phase, the trapped steam is doing its work. The bread is expanding, the crumb is setting, and that crust is forming.
Remove the lid and bake uncovered for 10 more minutes. This is when the magic happens visually. The crust will deepen to a deep amber brown. It will crackle and blister. Your kitchen will smell extraordinary. Do not open the oven door during this phase except to remove the lid every time you open it you lose heat and steam.
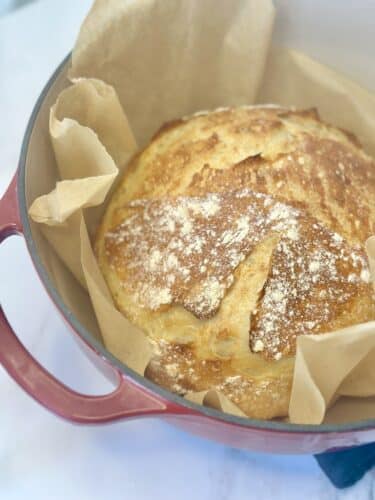
When the 10 minutes are up, turn off the oven. Remove the dutch oven and let the bread sit inside it for another 10 minutes before lifting it out. This continued resting in the residual heat finishes the bake gently. Then place the loaf on a cooling rack.
Step 8: Cool Completely And I Mean It
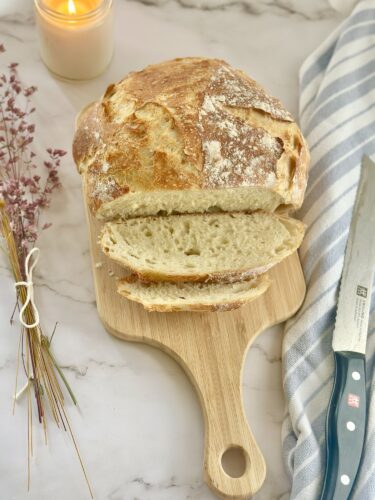
I know. I know how hard this is. The bread is sitting there on your counter, golden and crackling and perfect, and every instinct you have is screaming at you to cut into it right now. Do not cut the bread until it has fully cooled.
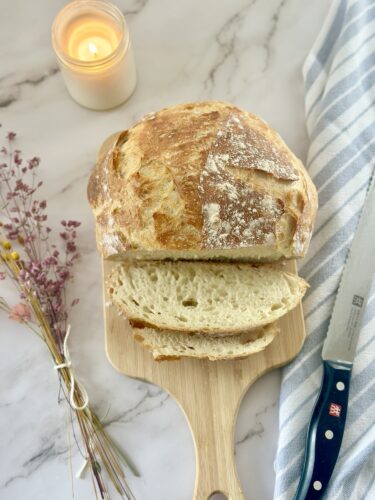
Here’s why: the interior of the bread is still actively setting as it cools. The moisture inside is redistributing. If you cut into a hot loaf, you’ll get a gummy, compressed crumb that looks underbaked even if it isn’t. Cutting too early is the number one mistake people make with homemade bread, and it’s entirely understandable and entirely avoidable.
Let it cool for at least one hour. Two is better. The crust will continue to crackle and sing as it cools that sound is deeply satisfying in a way I cannot fully explain.
Tips for Success
After making this same day artisan bread more times than I can count, here’s what I’ve learned the hard way so you don’t have to:
- Don’t skip the fridge step. I know I already said this but I’m saying it again. This is non-negotiable for a high hydration dough. Your loaf will be dramatically better for it.
- Use a hot dutch oven. Not warm. Not room temperature. It should be preheated inside the oven at 450°F for at least 20 to 30 minutes before the dough goes in. The initial blast of heat is everything.
- Flour your parchment. The dough will stick to parchment if it’s bare. A dusting of flour on the parchment before you place the dough on it makes transfer clean and easy.
- Score with confidence. A shallow, hesitant score does nothing. Be decisive.
- Check your yeast. If your yeast is old or was stored improperly, it won’t bloom correctly. Yeast that doesn’t foam in ten minutes is dead. Fresh yeast is cheap insurance.
- Trust the process. The dough will look shaggy, then rough, then sticky, then actually pretty good. Each fold is progress even when you can’t see it yet.
Want to Mix It Up?
Once you’ve made this plain same day artisan bread a couple of times and you’ve got the feel for it, the variations are endless. Some of my favorites:
- Rosemary and garlic: Add two tablespoons of finely chopped fresh rosemary and four minced garlic cloves when you mix the dough.
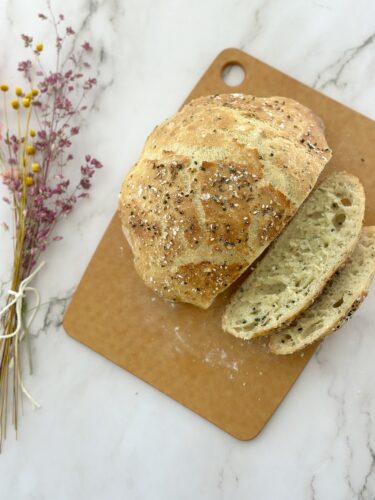
- Everything bagel: Press everything bagel seasoning onto the top of the dough before scoring.
- Olive and herb: Fold in half a cup of chopped kalamata olives and a tablespoon of fresh thyme during the second fold.
- Seeded crust: Press sunflower seeds, sesame, or poppy seeds onto the parchment before placing the dough on top.
How to Serve and Store It
There is nothing, absolutely nothing, better than a thick slice of this bread still slightly warm from the oven with a generous amount of salted butter. That’s the peak experience and I will not be taking questions.
Beyond that, this loaf is genuinely versatile:
- Alongside a pot of soup or stew (it was made for this)
- As a base for bruschetta or avocado toast
- As an absolutely elite sandwich bread
- Torn into chunks and served with good olive oil and balsamic for dipping
For storage: wrap the cooled loaf in a clean kitchen towel or a paper bag. Do not store it in plastic. Plastic traps moisture and turns your beautiful crackly crust into something soft and sad. It will keep at room temperature for two to three days. After that, slice and freeze it, then toast slices straight from frozen.
A Few Common Questions
Can I use bread flour instead of all-purpose? Yes, and the results will be even chewier with a slightly more developed crumb. Bread flour has a higher protein content, which means more gluten development. If you have it, use it. If not, all-purpose works beautifully.
What if I don’t have a dutch oven? A dutch oven really is the gold standard for home artisan bread, and if you bake bread with any regularity it’s worth investing in one. In a pinch, you can use an oven-safe pot with a tight lid. Just make sure it can handle 450°F.
Can I do the overnight rise in the fridge instead? Absolutely. After your first mix, you can cover the bowl tightly and refrigerate it overnight. Pull it out in the morning, let it come to room temperature for an hour or two, and then proceed with the folds. The slower, cold fermentation develops an even more complex flavor closer to sourdough territory.
My dough is really sticky. Is that normal? Yes. This is a high hydration dough and it is supposed to be sticky. That’s not a problem to fix; it’s the feature. Wet hands and forks are your friends here. Resist the urge to add more flour.
Enjoy!
Same day artisan bread changed the way I think about baking. For a long time I had convinced myself that real bread (the kind with a serious crust and a chewy, open crumb) was out of reach without a starter, special equipment, or skills I didn’t have. What I actually needed was six ingredients, a dutch oven, and the willingness to follow a simple process through to the end.
The folds take maybe two minutes each time. The rests are completely passive. The bake takes less than an hour. And what you pull out of the oven at the end of the day is genuinely one of the most satisfying things you can make in a home kitchen.
There is something quietly wonderful about making your own bread. About feeding people with something that started as a bowl of flour and water and yeast and your own hands. About hearing that crust crackle as it cools and knowing you did that.
Start on a Saturday morning when you’re going to be home anyway. Set a timer. Fold some dough. Preheat your oven. And at dinnertime, put a loaf of same day artisan bread on your table that looks like it came from a place with a line out the door. You’ll never look at that $8 farmers market loaf the same way again.
With love,
Bri and Cat
Easy Same-Day Artisan Loaf
Ingredients
- 3 cups all-purpose flour
- 1 packet active dry yeast 2¼ tsp
- 1¾ cups warm water about 110°F
- 1 tsp sugar
- 1 tsp salt
- 1 tsp olive oil
Equipment
- Large mixing bowl
- Two forks
- Plastic wrap or damp towel
- Dutch oven with lid, parchment paper
- Cooling rack
Method
- Bloom the yeast. In a large mixing bowl, combine warm water, sugar, and yeast. Stir gently and let sit for 10 minutes until foamy.
- Mix the dough. Add flour, salt, and olive oil. Stir until a shaggy, sticky dough forms, it will look rough, that’s normal. Do not knead.
- First rest. Cover with a damp towel or plastic wrap and let sit at room temperature for 1 hour.
- First fold. Using two forks or wet hands, pull the edges of the dough up and into the center, folding all the way around. Cover and rest for 1 more hour.
- Second fold. Repeat the fold-in method. Cover and rest for a third hour.
- Stretch and fold series. At the end of the third hour, perform 5–6 stretch and folds: grab the dough from the center, pull it up, and fold it in half. Rotate and repeat.
- Refrigerator rest. Place the dough in the refrigerator for 30 minutes, the cold helps the high-hydration dough hold its shape.
- Preheat. Place your Dutch oven (with lid) in the oven and preheat to 450°F. Allow 30–45 minutes for the Dutch oven to fully heat.
- Final stretch and fold. Remove from the fridge and do one final round of stretch and folds to tighten the dough into a ball.
- Shape and score. Place the dough ball on floured parchment paper. Rest 10 minutes, then score a line down the center with a sharp knife.
- Bake covered. Lower the parchment and dough into the hot Dutch oven. Cover and bake for 30 minutes.
- Bake uncovered. Remove the lid and bake an additional 10 minutes until deep golden brown.
- Rest and cool. Let the loaf sit in the Dutch oven for 10 minutes. Transfer to a cooling rack and cool completely before slicing, cutting too early makes the inside gummy.
Notes
- Water should feel warm to the touch but not hot, too hot kills the yeast.
- The dough will be very sticky throughout. Resist adding more flour.
- Wet hands work better than floured hands when folding.
- The Dutch oven must be fully preheated for a crispy crust.
- Do not cut until fully cooled (at least 30–60 minutes out of the oven).
Affiliate Disclaimer:
As an Amazon Associate I earn from qualifying purchases. This comes at no additional cost to you. We only recommend products that we believe will add value to our readers.
Check out some of our other bread recipes:
Leave a Reply