This site contains affiliate links, view the disclaimer page for more information.
Some days just feel like they were made to become a memory. Last week was one of those days. I loaded up the boys, tucked my baby girl into the carrier against my chest, and we headed out to the strawberry patch. The boys were practically vibrating with excitement on the way there, debating who was going to pick the most berries (spoiler: neither of them, because half of what they picked went straight into their mouths before it ever touched the bucket). And my little one? She slept through the whole thing like the tiny serene queen she is, cheek pressed warm against me while the boys ran the rows.
There is something about letting kids loose in a berry patch that I will never get tired of. The way they crouch down and hunt for the ripest ones, holding them up to the light like they found buried treasure. The way their hands and lips turn pink within minutes. The way my self-appointed quality control officer would announce “this one is perfect, Mama” and then eat it before I could even look. It was loud and muddy and we stayed way too long and I would do it again tomorrow.
We came home with more strawberries than I had any reasonable plan for, which is honestly the best problem to have in summer. And so, naturally, we made ice cream.

This recipe is the strawberry spin on the homemade ice cream base we already love around here. It uses sweetened condensed milk, real heavy whipping cream, vanilla, and now: strawberries in two glorious forms. A silky reduced strawberry sauce that gets folded right into the base, and fresh chopped berries that add little bursts of real fruit in every bite. It is lush and creamy and tastes like a summer afternoon in a bowl. And it is easier than you think.
Table of Contents
Why Homemade Ice Cream?
I am not going to pretend I never buy store-bought ice cream, because I absolutely do and I have no regrets about it. But there is a real difference in what goes into this version versus what is in most cartons at the grocery store. Here you have cream, milk (or the homemade condensed milk described below), vanilla, and fruit. That is it. No stabilizers, no artificial flavors, no ingredients you need a chemistry degree to decode.
Because we use real heavy whipping cream and either real condensed milk or the homemade version sweetened with honey, this ice cream is also naturally lower in refined sugar than most store-bought options. The strawberry sauce adds a little sugar for the reduction, but you are still talking about a treat you can feel genuinely good about serving.
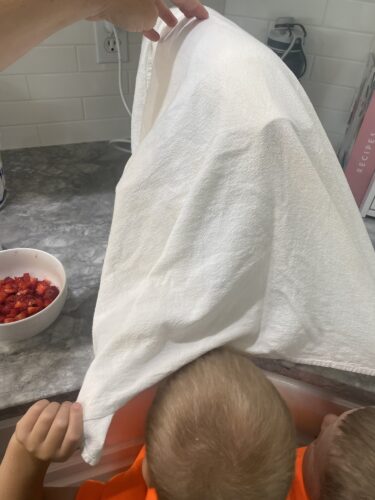
And honestly? The experience of making it is half the point. My boys love being in the kitchen. They love having a job and a reason to stand at the counter next to me. And they absolutely lose their minds for the KitchenAid. The moment I pull it out, they both appear from wherever they were, full of opinions and helpfulness. My older one likes to stand on his stool and peer under the kitchen towel I drape over the bowl to keep cream from spraying the ceiling. My younger boy is the official taste-tester, a role he takes very seriously. Every ingredient gets sampled. The vanilla? He needs to smell it first. The condensed milk? He could drink it. The strawberry sauce? He needed to try it warm, then again after it cooled, just to be sure.

This is what I want to remember. Sticky little hands and serious little faces making sure everything tastes exactly right.
Let’s Talk Strawberry Sauce First
This step can be done ahead of time, which I actually recommend. The sauce needs to cool completely before it goes into the ice cream base, so making it the morning of, or even the night before, is a great move.
You will need:
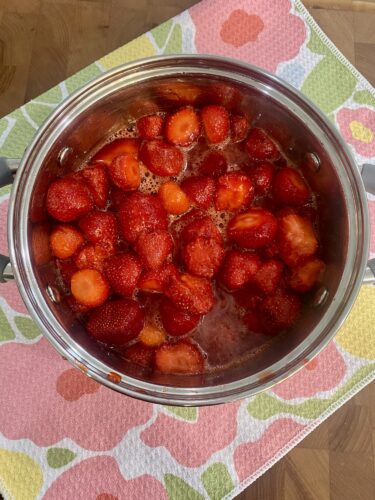
- About 2 cups of fresh strawberries, hulled and halved (we used our just-picked ones and they were incredible)
- 1/4 cup granulated sugar
- Juice of half a lemon
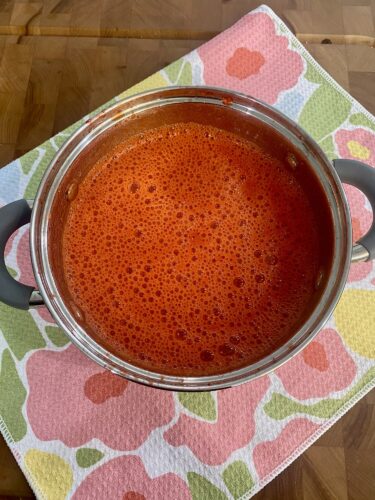
Combine everything in a small saucepan over medium-low heat. Stir it together and let it start to bubble and break down. Once it hits a simmer, reduce the heat to low and let it go for 15 to 20 minutes, stirring occasionally. The strawberries will soften completely and the liquid will thicken into a gorgeous deep red sauce. It will smell unbelievable. Your kids will want to taste it every four minutes. Let them.
Once the time is up, pull out your immersion blender and blend it right in the pot until smooth. If you do not have an immersion blender, a regular blender works fine, just let the sauce cool a little first so you are not dealing with hot steam in a sealed blender.
You should end up with roughly 1 to 1.5 cups of reduced strawberry sauce. Use about 1 to 1.25 cups in the ice cream and save the rest. That leftover sauce is your topping, and it is phenomenal drizzled warm over a scoop once everything is frozen.
The Homemade Condensed Milk (My Preferred Method!)
I make my own condensed sweetened milk for this ice cream because it is simple, it tastes better, and I know exactly what is in it. The store-bought version is perfectly fine if you are in a rush, but if you have 30ish minutes, I really encourage you to try the homemade route at least once. It feels so satisfying.
For this recipe, we are using the equivalent of about 1.5 cans of sweetened condensed milk, so here is the scaled-up version:
Ingredients for homemade condensed milk:
- 2 and 1/2 cups whole milk (organic and grass-fed if you can find it)
- 3/4 cup local honey
Method:
Combine the milk and honey in a medium saucepan and whisk well to help the honey start dissolving into the milk. Bring it to a gentle simmer over low to medium-low heat. Let it simmer for about 30-40 minutes, stirring occasionally, until it reduces to about 1/2 and thickens noticeably (Note: it will not be as thick as the store bought kind). Keep the heat low and stay nearby. You do not want it to scorch on the bottom.
When it is done, it will be sweet, slightly thick, and creamy. Pour it into a bowl or jar and let it cool to room temperature before you use it. You can make this at the same time as the strawberry sauce so both are ready to go when you need them.
If you prefer to use canned condensed milk: one and a half cans (14 oz each) works perfectly here. Nothing wrong with that shortcut on a busy day. (Note: one can makes the finished ice cream slightly less sweet overall, which I prefer sometimes).
Now, the Ice Cream
Once your strawberry sauce is cooled and your condensed milk is ready, this comes together so fast.
What You Need
For the ice cream base:
- 4 cups (1 quart) cold heavy whipping cream
- Homemade condensed sweetened milk (recipe above) OR 1-1.5 cans store-bought sweetened condensed milk
- 2 tablespoons vanilla extract (or 1 tablespoon vanilla extract and 1 tablespoon vanilla bean paste)
Strawberry additions:
- 1 to 1.25 cups cooled strawberry reduction sauce (see above)
- 0.5-1 cup fresh strawberries, hulled and chopped into small pieces
For topping:
- Remaining reduced strawberry sauce, warmed slightly and drizzled over scoops when serving
Step 1: Make the Strawberry Sauce and Condensed Milk
See the directions above! Get both of these done and fully cooled before you start the cream. I cannot stress enough: the sauce needs to be at room temperature or cooler before it goes in. If it is warm, it will deflate your whipped cream and you will end up with ice cream soup, which, while delicious, is not the goal.
Step 2: Whip the Cream
This is the moment the boys have been waiting for all day.
Pour your cold heavy cream into your Kitchenaid mixing bowl. Cold is important here. If you have time, toss the bowl and whisk attachment in the freezer for ten minutes before you start. It helps the cream whip up faster and gives you a more stable result. I use a glass bowl, however stainless will work too.
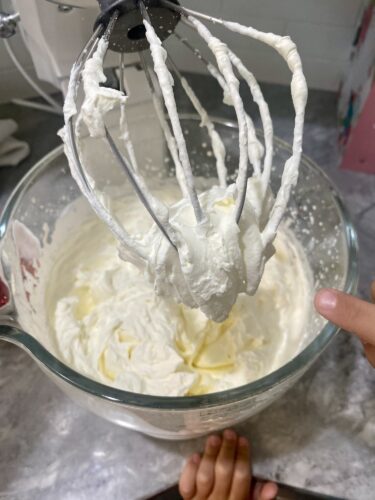
If you are using a stand mixer, start at speed 2 and work your way up to speed 8 or 10 over a minute or two. Cover the bowl loosely with a clean kitchen towel, because the cream will spray at the higher speeds and your ceiling does not need a new paint job. Let the kids take turns lifting the towel to peek at the progress. It is genuinely thrilling. My little one narrates the whole process. “It is getting fluffier, mama. It is SO fluffy now. Mama. MAMA. Look at it. It’s DONE!”
Whip until you have stiff peaks. This takes about 3 to 5 minutes with a stand mixer and closer to 7 to 9 minutes by hand. Stiff peaks means when you lift the beater out, the cream holds its shape and does not flop over. You want it firm but not grainy. (Like a mix between whipped cream and cool whip consistency.)
Step 3: Fold in the Good Stuff
Drop your mixer to its lowest speed and gently add in the cooled condensed milk and the vanilla. Let it just barely come together, then stop. You are folding here, not beating. The air in that whipped cream is what gives you a scoopable, creamy texture instead of a dense frozen block, so treat it gently.
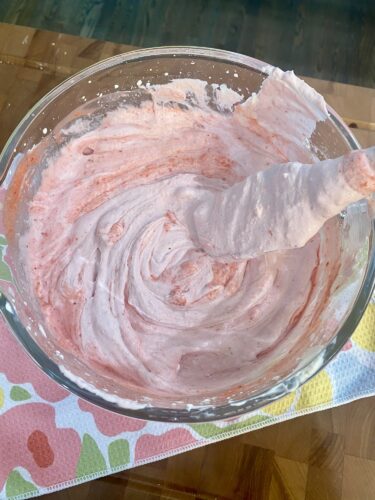
Once the base is just combined, add in your cooled strawberry reduction sauce. Fold it in with a spatula using slow, sweeping motions from the bottom of the bowl up. You will see the whole mixture turn this beautiful blush pink color. It is really pretty. One of my boys told me it looked like a sunset. I wrote that down immediately.
Taste it. Adjust if you want. A little more vanilla is never wrong.
Finally, fold in the fresh chopped strawberries with a spatula. These stay in pieces and give you little pockets of real fruit throughout the finished ice cream.
Step 4: Freeze It
Transfer your mixture into a freezer-safe container. I use these ice cream containers, but any airtight freezer container works great. Smooth the top with a spatula.
Press a piece of plastic wrap or parchment directly onto the surface of the ice cream before sealing with a lid. This prevents ice crystals from forming on top.
Freeze for at least 6 hours. Overnight is better. I know. It is brutal. We made it in the afternoon and then had to wait until after dinner and it took approximately “one thousand years” according to my oldest.
Step 5: Scoop, Top, and Enjoy
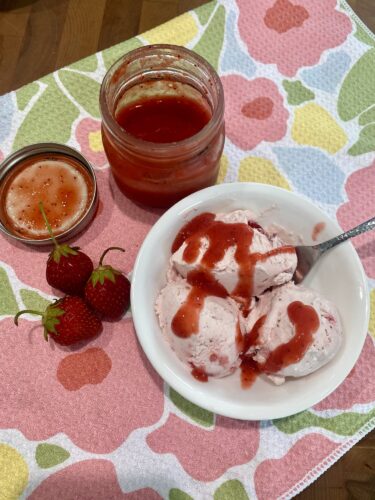
Pull it out of the freezer, let it sit on the counter for about 5 minutes to soften slightly, then scoop away. Warm your leftover strawberry sauce in a small saucepan or the microwave and drizzle it right over the top. It is the prettiest thing and it makes the whole bowl taste like you put real effort in, which you did, but it also looked very impressive when I served it to my husband- Betty Crocker vibes.
Serve in bowls (the kids love these!) or waffle cones. Or, if you are my youngest, eat it straight from the container with a big spoon while standing at the freezer door at 7 AM the next morning, because apparently yesterday’s effort established no boundaries around ice cream timing (and it’s summer, so why not!).
Full Recipe at a Glance
Homemade Strawberry Ice Cream
Strawberry Sauce:
- About 2 cups fresh strawberries, hulled and halved
- 1/4 cup granulated sugar
- Juice of half a lemon
Simmer over low heat for 15 to 20 minutes until thickened. Blend with immersion blender until smooth. Cool completely. Reserve about 1/4 to 1/2 cup for topping.
Homemade Condensed Sweetened Milk (preferred):
- 2 and 1/2 cups whole milk
- 3/4 cup local honey
Whisk together in a saucepan. Simmer on low for 20 to 25 minutes until thickened. Cool completely before using. (OR substitute 1.5 cans store-bought sweetened condensed milk.)
Ice Cream Base:
- 4 cups (1 quart) cold heavy whipping cream
- All of the cooled homemade condensed milk (or 1.5 cans store-bought)
- 2 tablespoons pure vanilla extract
- 1 to 1.25 cups cooled strawberry reduction sauce
- 1 cup fresh strawberries, hulled and chopped small
Instructions:
- Make the strawberry sauce and condensed milk first. Both must be completely cool before use.
- Whip cold heavy cream in a large bowl to stiff peaks, 3 to 5 minutes with a stand mixer or 7 to 9 minutes by hand.
- With the mixer on low, gently blend in the condensed milk and vanilla until just incorporated.
- Fold in the cooled strawberry sauce with a spatula until the mixture is evenly pink.
- Fold in the fresh chopped strawberries.
- Pour into a freezer-safe container, press plastic wrap to the surface, and freeze for at least 6 hours or overnight.
- Let sit at room temperature for 5 minutes before scooping. Drizzle with reserved warmed strawberry sauce to serve.
Tips for Success
Keep everything cold. Cold cream, cold bowl if you can swing it, cold condensed milk. Warm ingredients fight the whipping process and you will end up with less volume.
Cool the sauce completely. I know I said this already. I am saying it again because I once added slightly warm sauce to my cream and had to start over. Learn from me.
Do not overmix. The moment your condensed milk is incorporated, stop. Every extra second risks deflating the cream.
Let the kids help. Seriously. Even at their messiest, having them involved makes this recipe a hundred times better than any version you could make alone. The tasting, the peeking, the very serious quality control discussions. It is the whole point.
Leftovers and Storage
Store covered in the freezer for up to two weeks. Let it sit out for a few minutes before scooping each time. The leftover strawberry sauce keeps in the fridge in a sealed jar for up to a week and is also incredible on yogurt, pancakes, or spooned straight into your mouth at midnight. No judgment.
This ice cream came together on one of those slow summer afternoons that I want to bottle up and keep forever. My baby girl asleep in the carrier, warm and milky and completely unbothered. Both boys pink-lipped and proud, insisting they did all the work. The whole house smelling like strawberries and vanilla. That is summer. That is it exactly.
I hope it brings the same kind of afternoon to your kitchen.
With love,
Bri & Cat
Loved this recipe? Don’t miss the vanilla version that started it all! My Classic Homemade 4-Ingredient Vanilla Ice Cream is the perfect base recipe and just as easy to make with the kids. Check it out right here!
Homemade Strawberry Ice Cream
Ingredients
- About 2 cups fresh strawberries hulled and halved
- 1/4 cup granulated sugar
- Juice of half a lemon
- 2 1/2 cups whole milk
- 3/4 cup local honey
- OR substitute 1.5 cans store-bought sweetened condensed milk
- 4 cups 1 quart cold heavy whipping cream
- All of the cooled condensed milk homemade or store-bought
- 2 tablespoons pure vanilla extract
- 1 to 1.25 cups cooled strawberry reduction sauce
- 1 cup fresh strawberries hulled and chopped small
Equipment
- Medium saucepan (for strawberry sauce)
- Small saucepan (for condensed milk, if homemade)
- Immersion blender
- Large mixing bowl (chilled, if possible)
- Stand mixer or hand mixer
- Spatula
- Freezer-safe container with lid
- Plastic wrap
Method
- Make the strawberry sauce: simmer strawberries, sugar, and lemon juice over low heat for 15 to 20 minutes until thickened. Blend smooth with an immersion blender. Cool completely. Reserve 1/4 to 1/2 cup for topping.
- Make the condensed milk: whisk milk and honey together in a saucepan. Simmer on low for 20 to 25 minutes until thickened. Cool completely. (Skip this step if using store-bought.)
- Whip cold heavy cream in a large bowl to stiff peaks, 3 to 5 minutes with a stand mixer or 7 to 9 minutes by hand.
- With the mixer on low, gently blend in the condensed milk and vanilla until just incorporated.
- Fold in the cooled strawberry sauce with a spatula until evenly pink.
- Fold in the fresh chopped strawberries.
- Pour into a freezer-safe container, press plastic wrap to the surface, and freeze at least 6 hours or overnight.
- Let sit at room temperature for 5 minutes before scooping. Drizzle with reserved warmed strawberry sauce to serve.
Notes
- Keep everything cold: cold cream, cold bowl if possible, cold condensed milk. Warm ingredients fight the whipping process and reduce volume.
- Cool the sauce completely before adding it to the cream. Warm sauce will deflate your whipped cream.
- Do not overmix once the condensed milk is incorporated. Every extra second risks losing volume.
- Let the kids help. The mess is part of the process, and their taste-testing and quality control make it better.
Affiliate Disclaimer:
As an Amazon Associate I earn from qualifying purchases. This comes at no additional cost to you. We only recommend products that we believe will add value to our readers.
Leave a Reply